Saturday, March 30, 2019

HTTPS with Visual Studio's built-in ASP.NET Development Server


You need to enable the SSL in the project by using the below steps:
  • Enable the SSL with in IIS Express, you have to just set “SSL Enabled = true” in the project properties window.
  • Then you can start your project with IIS Express normally and it will start using SSL, the new Port will be 44301
Note : https and http both ports are generally different. By default SSL enabled is set to false with IIS Express; so if you run your web application first time, you will only be able to find the default URL and you can access the site over http.

Friday, March 15, 2019

Thursday, March 14, 2019

Ms Sql Server - The Visual Studio Component is out of date. Please restart Visual Studio. (Mscorlib)

SSMS Error: "The Visual Studio Component is out of date. Please restart Visual Studio. (Mscorlib)"

When you are trying to open Query or execute query in Microsoft SQL Server Management Studio, you may see the following message:

The Visual Studio Component is out of date. Please restart Visual Studio. (Mscorlib).

Cause: Sometimes cache of the Sql Server corrupted due to Updates in the visual studio or Sql-Server components updates.

Solution : 

STEP 1: Delete the Temp Files. Shortcut to delete the temp files


STEP 2: Restart Microsoft SQL Server Management Studio and the error message will have disappeared.


A network-related or instance-specific error occurred while establishing a connection to SQL Server - microsoft sql server error 2


SSMS Error: "A network-related or instance-specific error occurred while establishing a connection to SQL Server"

When you are trying to connect to a SQL Server using Microsoft SQL Server Management Studio, you may see the following message:

A network-related or instance-specific error occurred while establishing a connection to SQL Server. The server was not found or was not accessible. Verify that the instance name is correct and that the SQL Server is configured to allow remote connections. (provided: Named Pipes Provider, error: 40- Could not open a connection to the SQL Server) (Microsoft SQL Server, Error: 2).

While the message tells you to check some of the items that can cause this issue, it fails to mention that if your SQL Server Service is not started, then you cannot connect. One of the first things that you should check is that the SQL Server (MSSQLSERVER) is started. You can go to the Services Console (services.msc) and look for SQL Server (MSSQLSERVER) to see that it is started. If not, then start the service.

You could also do this through an elevated command prompt by typing net start mssqlserver.


Thursday, February 28, 2019

WooCommerce Order Cancelled After Successful Payment: Unpaid Order Cancelled – Time Limit Reached

After upgrading to WooCommerce 2.0 and Above, you have experienced the issue  that all the purchased order changes to the “canceled” status. 
In the admin area, all the orders appear as “canceled”  with the message “Unpaid order canceled – time limit reached“. When this happens, you need manually change the statuses of all the canceled orders.
The problem arises due to the Hold Stock feature in WooCommerce Inventory management. In this feature, you can set a certain period of time to hold the stock for an unpaid order.
To Resolve the issue, Go to the admin side of your WordPress store, and navigate to
 WooCommerce > Settings > Products > Inventory.
From this page, you can see that the Hold Stock field is set to 60 minutes by default. If you are using WooCommerce stock management, you can disable this feature by leaving the field blank. Simply delete the value in the field and then save the changes.


Tuesday, February 26, 2019

Sql Server - Create a copy of database and Renaming it

Steps to attach a database with different name:

  1. Detach database from local PC
  2. Copy the mdf and ldf files and rename them.
  3. Copy\Move the files to the server directory where the original Database is stored.
  4. Use the below code
USE [master]
GO
CREATE DATABASE [example_db] ON ( FILENAME = N'D:\Data\example_db.mdf' ),
( FILENAME = N'E:\Logs\example_db_log.ldf' )FOR ATTACH
GO


you can also copy by using the Sql-server Management studio:

  • go to database and tasks->Copy Database
  • Select the source and destination server (same if you wants to make a copy on the same server)
  • change the destination database name to required.
  • Done

Friday, February 15, 2019

Wordpress - How to revert to classic editor / old editor?

How to revert to classic editor / old editor?

if you wants to move back to the old Classic Editor By WordPress Contributors, please install the Plugin
https://wordpress.org/plugins/classic-editor/

Classic Editor is an official plugin maintained by the WordPress team that restores the previous (“classic”) WordPress editor and the “Edit Post” screen. It makes it possible to use plugins that extend that screen, add old-style meta boxes, or otherwise depend on the previous editor.


This plugin also gives you an option to keep both Gutenberg and the Classic editor at the same time. You can configure this in the plugin’s settings.

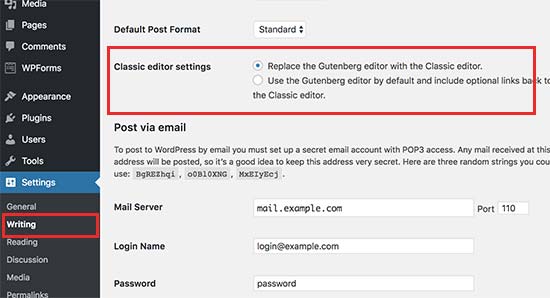
Simply go to the Settings » Writing page in your WordPress admin area. You will see the option to do this under “Classic editor settings”.
Classic editor settings

Don’t forget to click on the save changes button to store your settings.

You will now be able to see a new link under the Posts menu to create new posts using the classic editor.
Switch to classic editor

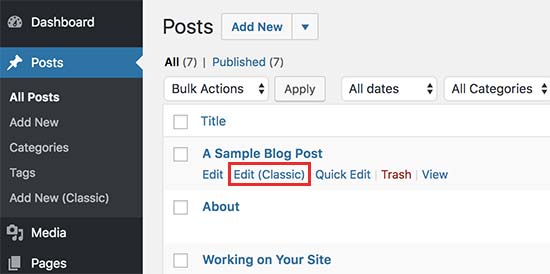
You will also be able to edit older articles using the classic editor. Simply go to Posts » All Posts page and you’ll see a ‘Edit (Classic)’ link below posts.
Edit classic


Tuesday, January 1, 2019

How to transfer logins and passwords between SQL Server

Transfer logins and passwords to destination server (Server A) using scripts generated on source server (Server B)

To create a script on the source Server, follow these steps:

  1. On server A, start SQL Server Management Studio, and then connect to the instance of SQL Server from which you moved the database.
  2. Open a new Query Editor window, and then run the following script.
    USE master
    GO
    IF OBJECT_ID ('sp_hexadecimal') IS NOT NULL
      DROP PROCEDURE sp_hexadecimal
    GO
    CREATE PROCEDURE sp_hexadecimal
        @binvalue varbinary(256),
        @hexvalue varchar (514) OUTPUT
    AS
    DECLARE @charvalue varchar (514)
    DECLARE @i int
    DECLARE @length int
    DECLARE @hexstring char(16)
    SELECT @charvalue = '0x'
    SELECT @i = 1
    SELECT @length = DATALENGTH (@binvalue)
    SELECT @hexstring = '0123456789ABCDEF'
    WHILE (@i <= @length)
    BEGIN
      DECLARE @tempint int
      DECLARE @firstint int
      DECLARE @secondint int
      SELECT @tempint = CONVERT(int, SUBSTRING(@binvalue,@i,1))
      SELECT @firstint = FLOOR(@tempint/16)
      SELECT @secondint = @tempint - (@firstint*16)
      SELECT @charvalue = @charvalue +
        SUBSTRING(@hexstring, @firstint+1, 1) +
        SUBSTRING(@hexstring, @secondint+1, 1)
      SELECT @i = @i + 1
    END
    
    SELECT @hexvalue = @charvalue
    GO
     
    IF OBJECT_ID ('sp_help_revlogin') IS NOT NULL
      DROP PROCEDURE sp_help_revlogin
    GO
    CREATE PROCEDURE sp_help_revlogin @login_name sysname = NULL AS
    DECLARE @name sysname
    DECLARE @type varchar (1)
    DECLARE @hasaccess int
    DECLARE @denylogin int
    DECLARE @is_disabled int
    DECLARE @PWD_varbinary  varbinary (256)
    DECLARE @PWD_string  varchar (514)
    DECLARE @SID_varbinary varbinary (85)
    DECLARE @SID_string varchar (514)
    DECLARE @tmpstr  varchar (1024)
    DECLARE @is_policy_checked varchar (3)
    DECLARE @is_expiration_checked varchar (3)
    
    DECLARE @defaultdb sysname
     
    IF (@login_name IS NULL)
      DECLARE login_curs CURSOR FOR
    
          SELECT p.sid, p.name, p.type, p.is_disabled, p.default_database_name, l.hasaccess, l.denylogin FROM 
    sys.server_principals p LEFT JOIN sys.syslogins l
          ON ( l.name = p.name ) WHERE p.type IN ( 'S', 'G', 'U' ) AND p.name <> 'sa'
    ELSE
      DECLARE login_curs CURSOR FOR
    
    
          SELECT p.sid, p.name, p.type, p.is_disabled, p.default_database_name, l.hasaccess, l.denylogin FROM 
    sys.server_principals p LEFT JOIN sys.syslogins l
          ON ( l.name = p.name ) WHERE p.type IN ( 'S', 'G', 'U' ) AND p.name = @login_name
    OPEN login_curs
    
    FETCH NEXT FROM login_curs INTO @SID_varbinary, @name, @type, @is_disabled, @defaultdb, @hasaccess, @denylogin
    IF (@@fetch_status = -1)
    BEGIN
      PRINT 'No login(s) found.'
      CLOSE login_curs
      DEALLOCATE login_curs
      RETURN -1
    END
    SET @tmpstr = '/* sp_help_revlogin script '
    PRINT @tmpstr
    SET @tmpstr = '** Generated ' + CONVERT (varchar, GETDATE()) + ' on ' + @@SERVERNAME + ' */'
    PRINT @tmpstr
    PRINT ''
    WHILE (@@fetch_status <> -1)
    BEGIN
      IF (@@fetch_status <> -2)
      BEGIN
        PRINT ''
        SET @tmpstr = '-- Login: ' + @name
        PRINT @tmpstr
        IF (@type IN ( 'G', 'U'))
        BEGIN -- NT authenticated account/group
    
          SET @tmpstr = 'CREATE LOGIN ' + QUOTENAME( @name ) + ' FROM WINDOWS WITH DEFAULT_DATABASE = [' + @defaultdb + ']'
        END
        ELSE BEGIN -- SQL Server authentication
            -- obtain password and sid
                SET @PWD_varbinary = CAST( LOGINPROPERTY( @name, 'PasswordHash' ) AS varbinary (256) )
            EXEC sp_hexadecimal @PWD_varbinary, @PWD_string OUT
            EXEC sp_hexadecimal @SID_varbinary,@SID_string OUT
     
            -- obtain password policy state
            SELECT @is_policy_checked = CASE is_policy_checked WHEN 1 THEN 'ON' WHEN 0 THEN 'OFF' ELSE NULL END FROM sys.sql_logins WHERE name = @name
            SELECT @is_expiration_checked = CASE is_expiration_checked WHEN 1 THEN 'ON' WHEN 0 THEN 'OFF' ELSE NULL END FROM sys.sql_logins WHERE name = @name
     
                SET @tmpstr = 'CREATE LOGIN ' + QUOTENAME( @name ) + ' WITH PASSWORD = ' + @PWD_string + ' HASHED, SID = ' + @SID_string + ', DEFAULT_DATABASE = [' + @defaultdb + ']'
    
            IF ( @is_policy_checked IS NOT NULL )
            BEGIN
              SET @tmpstr = @tmpstr + ', CHECK_POLICY = ' + @is_policy_checked
            END
            IF ( @is_expiration_checked IS NOT NULL )
            BEGIN
              SET @tmpstr = @tmpstr + ', CHECK_EXPIRATION = ' + @is_expiration_checked
            END
        END
        IF (@denylogin = 1)
        BEGIN -- login is denied access
          SET @tmpstr = @tmpstr + '; DENY CONNECT SQL TO ' + QUOTENAME( @name )
        END
        ELSE IF (@hasaccess = 0)
        BEGIN -- login exists but does not have access
          SET @tmpstr = @tmpstr + '; REVOKE CONNECT SQL TO ' + QUOTENAME( @name )
        END
        IF (@is_disabled = 1)
        BEGIN -- login is disabled
          SET @tmpstr = @tmpstr + '; ALTER LOGIN ' + QUOTENAME( @name ) + ' DISABLE'
        END
        PRINT @tmpstr
      END
    
      FETCH NEXT FROM login_curs INTO @SID_varbinary, @name, @type, @is_disabled, @defaultdb, @hasaccess, @denylogin
       END
    CLOSE login_curs
    DEALLOCATE login_curs
    RETURN 0
    GO
    Note This script creates two stored procedures in the master database. The procedures are named sp_hexadecimal and sp_help_revlogin.
  3. Run the following statement in the same or a new query window:

    EXEC sp_help_revlogin

    The output script that the sp_help_revlogin stored procedure generates is the login script. This login script creates the logins that have the original Security Identifier (SID) and the original password.

Steps on the destination server (Server B):


  • On server B, start SQL Server Management Studio, and then connect to the instance of SQL Server to which you moved the database.
  • Open a new Query Editor window, and then run the output script that's generated in step 2 of the preceding procedure.

Monday, December 31, 2018

Amazon AWS, Create Access Key and Secret Key

AWS Amazon, Create Access Key and Secret Key

Creating, Disabling, and Deleting Access Keys for Your AWS Account Root User

  1. Use your AWS account email address and password to sign in to the AWS Management Console as the AWS account root user.
     
  2. Choose your account name in the navigation bar, and then choose My Security Credentials.
     
  3. If you see a warning about accessing the security credentials for your AWS account, choose Continue to Security Credentials
     
  4. Expand the Access keys (access key ID and secret access key) section.
     
  5. Choose Create New Access Key. If this feature is disabled, then you must delete one of the existing access keys before you can create a new key. For more information, see IAM Entity Object Limits in the IAM User Guide.
     
  6. A warning explains that you have only this one opportunity to view or download the secret access key. It cannot be retrieved later.
     
    1. Choose Show Access Key to copy the access key ID and secret key from your browser window and paste it somewhere else.
       
    2. Choose Download Key File to download the rootkey.csv file that contains the access key ID and the secret key. Save the file somewhere safe.


Thursday, December 27, 2018

IIS, Registering the ASP.Net with IIS server


  1. You need to start command prompt by typing cmd at the Run command and then execute the command prompt with Administrator rights by right clicking and choosing Run as administrator from the context menu.
     
  2. Then on the command prompt you need to navigate to the Directory that has the aspnet_regiis.exe file for that you need to type

      CD C:\Windows\Microsoft.NET\Framework64\v4.0.30319\
     
  3. Then you need to type the following command and hit enter to register ASP.Net with IIS

      aspnet_regiis -i